> ## Documentation Index
> Fetch the complete documentation index at: https://checkly-422f444a-paula-tree-202-entitlements-group-troubles.mintlify.site/llms.txt
> Use this file to discover all available pages before exploring further.
# Webhook Integrations
> Create custom webhook integrations to send Checkly alerts to any API endpoint with advanced templating and security features
**Monitoring as Code**: Learn more about the [Webhook Alert Channel Construct](/constructs/webhook-alert-channel).
Webhooks provide the most flexible way to integrate Checkly with any system that accepts HTTP requests. Create sophisticated integrations with custom endpoints using templating, conditional logic, and security features.
## Basic Webhook Setup
Navigate to Alert Settings and choose Webhook as your channel type
Set your webhook URL, HTTP method, and authentication headers
Design your request body using Checkly's templating system
Send test alerts to verify your webhook integration works correctly
## Template Variables
Use dynamic variables to create contextual alerts:
| Variable | Description | Example Value |
| --------------------- | ----------------------------- | ------------------------------------------------------------- |
| `CHECK_NAME` | Full check name | "Payment API Health Check" |
| `CHECK_ID` | UUID of the check | "abc123-def456-ghi789" |
| `CHECK_TYPE` | Type of check | "API", "BROWSER", "HEARTBEAT" |
| `ALERT_TITLE` | Human-readable alert title | "Check 'Payment API' has failed" |
| `ALERT_TYPE` | Alert event type | "ALERT\_FAILURE", "ALERT\_RECOVERY" |
| `CHECK_RESULT_ID` | UUID of the result | "result-123-456" |
| `CHECK_ERROR_MESSAGE` | Error details | "Connection timeout after 5000ms" |
| `RESPONSE_TIME` | Response time in milliseconds | 1234 |
| `RUN_LOCATION` | Location where check ran | "N. Virginia" |
| `RESULT_LINK` | Direct link to results | "[https://app.checklyhq.com/](https://app.checklyhq.com/)..." |
| `STARTED_AT` | ISO timestamp | "2024-01-15T14:30:22.000Z" |
| `TAGS` | Array of check tags | \["critical", "payment", "api"] |
| `GROUP_NAME` | Group name if applicable | "Payment Services" |
### Handlebars Helpers
| Helper | Description |
| -------------------- | ------------------------------------------------------------------------- |
| `{{REGION}}` | Resolves to the AWS region name (e.g., `us-east-1`) |
| `{{$UUID}}` | Generates a random UUID/v4 (e.g., `9b1deb4d-3b7d-4bad-9bdd-2b0d7b3dcb6d`) |
| `{{$RANDOM_NUMBER}}` | Generates a random decimal number between 0 and 1000 (e.g., `345`) |
| `{{moment}}` | Generates dates/times using **moment.js** with formatting: |
* `{{moment "YYYY-MM-DD"}}` → `2020-08-26`
* `{{moment "2 days ago" "YYYY-MM-DD"}}` → `2020-08-24`
* `{{moment "last week" "X"}}` → `1597924480`
A practical example of using the `{{moment}}` helper would be setting the pagination options on a typical API endpoint:
```bash api-request theme={null}
GET https://api.acme.com/events?from={{moment "last week" "X"}}&to={{moment "X"}}
```
> You can find the [full list of helpers in the README.md file](https://github.com/checkly/handlebars) of the underlying library we are using.
> For a full overview of date formatting option, check the [moment.js docs](https://momentjs.com/docs/#/displaying/format/).
Create dynamic webhook content with conditional formatting:
```json webhook-payload.json theme={null}
{
"priority": "{{#eq ALERT_TYPE 'ALERT_FAILURE'}}P1{{else}}{{#eq ALERT_TYPE 'ALERT_DEGRADED'}}P2{{else}}P3{{/eq}}{{/eq}}",
"environment": "{{#contains CHECK_NAME 'prod'}}production{{else}}{{#contains CHECK_NAME 'staging'}}staging{{else}}development{{/contains}}{{/contains}}",
"escalation_needed": {{#and (eq ALERT_TYPE 'ALERT_FAILURE') (contains TAGS 'critical')}}true{{else}}false{{/and}},
"formatted_tags": [{{#each TAGS}}"{{uppercase this}}"{{#unless @last}},{{/unless}}{{/each}}],
"response_time_category": "{{#gt RESPONSE_TIME 5000}}slow{{else}}{{#gt RESPONSE_TIME 2000}}medium{{else}}fast{{/gt}}{{/gt}}",
"alert_color": "{{#eq ALERT_TYPE 'ALERT_FAILURE'}}#ff0000{{else}}{{#eq ALERT_TYPE 'ALERT_DEGRADED'}}#ffa500{{else}}#00ff00{{/eq}}{{/eq}}"
}
```
## Webhook Secrets
You can validate each webhook we deliver to your endpoint(s). Using the optional webhook secret, you can:
1. Check if the webhook was sent by Checkly.
2. Check if the payload was not altered in any way during transmission.
When you create a webhook secret, we proceed to use that secret token to cryptographically sign the webhook payload using
the SHA256 hash algorithm. We add the resulting hash to the HTTP header `x-checkly-signature` on each webhook.
On the receiving end, you can then use the value of the `x-checkly-signature` header to assert the validity and authenticity
of the webhook and its payload.
Have a look at the code examples below on how to use the header and your favourite web framework.
```javascript webhook-server.js theme={null}
// We store the webhook secret in an environment variable called CHECKLY_WEBHOOK_SECRET
const app = require('express')();
const bodyParser = require('body-parser');
const crypto = require('crypto');
function isVerifiedPayload (payload, signature) {
const secret = process.env.CHECKLY_WEBHOOK_SECRET
const hmac = crypto.createHmac('sha256', secret)
const digest = hmac.update(payload).digest('hex')
return crypto.timingSafeEqual(Buffer.from(digest), Buffer.from(signature))
}
app.post('/webhook', bodyParser.json({ type: 'application/json' }), (request, response) => {
const signature = request.headers['x-checkly-signature'];
const payload = JSON.stringify(request.body)
if (isVerifiedPayload(payload, signature)) {
console.log('Signature is valid')
response.status(200).send();
} else {
console.error('Signature does not match')
response.status(400).send();
}
});
app.listen(4242, () => console.log('Running on port 4242'))
```
```ruby webhook-server.rb theme={null}
# We store the webhook secret in an environment variable called CHECKLY_WEBHOOK_SECRET
require 'sinatra'
set :port, 4242
post '/webhook' do
signature = request.env['HTTP_X_CHECKLY_SIGNATURE']
payload = request.body.read
digest = OpenSSL::HMAC.hexdigest(OpenSSL::Digest.new('sha256'), ENV['CHECKLY_WEBHOOK_SECRET'], payload)
if Rack::Utils.secure_compare(digest, signature)
status 200
return
else
status 400
return
end
end
```
```python webhook-handler.py theme={null}
# This example assumes you use Django
import hmac
from hashlib import sha256
from django.conf import settings
from django.http import HttpResponse, HttpResponseBadRequest
from django.views.decorators.csrf import csrf_exempt
from django.utils.encoding import force_bytes
import json
@csrf_exempt
def webhook(request):
signature = request.META.get('HTTP_X_CHECKLY_SIGNATURE')
mac = hmac.new(settings.CHECKLY_WEBHOOK_SECRET.encode('utf-8'), msg=request.body, digestmod=sha256)
print(mac.hexdigest())
if not hmac.compare_digest(mac.hexdigest(), signature):
return HttpResponseBadRequest()
return HttpResponse()
```
## Webhook Retries
Checkly will retry your webhook up to **5 times** if we get an HTTP response higher than 399, e.g. a 404 or 503. Each retry
is backed off 20 seconds for a total retry period of `5 * 20 = 100 seconds`.
This means that for checks on a 1 minute schedule, there is a potential overlap between a failure alert and recovery alert. For this
reason every webhook we send has a timestamp in the `x-checkly-timestamp` header. You can use this timestamp on the receiving
end to ignore any webhooks that come in "late".
## Webhook Examples
The following examples give an idea how to integrate Checkly with 3rd party alerting and issue tracking systems.
### OpsGenie
You can create an OpsGenie alert by POST-ing the following body
```json opsgenie-webhook.json theme={null}
{
"message": "{{ALERT_TITLE}}",
"description": "{{ALERT_TYPE}}
{{STARTED_AT}} ({{RESPONSE_TIME}}ms)
{{RESULT_LINK}}",
"tags": [{{#each TAGS}} "{{this}}" {{#unless @last}},{{/unless}} {{/each}}]
}
```
to the OpsGenie `alerts` API endpoint
```bash endpoint-url theme={null}
https://{{OPSGENIE_API_KEY}}@api.opsgenie.com/v2/alerts
```
Or you can add the OpsGenie API key in the headers, e.g.
```
Authorization: GenieKey {{OPSGENIE_API_KEY}}
```
This is an example of a full alert body:
```json opsgenie-full-webhook.json theme={null}
{
"message": "{{ALERT_TITLE}}",
"description": "{{ALERT_TYPE}}: {{CHECK_NAME}}
{{STARTED_AT}} ({{RESPONSE_TIME}}ms)
{{RESULT_LINK}}",
"responders": [
{
"id":"4513b7ea-3b91-438f-b7e4-e3e54af9147c",
"type":"team"
}
],
"tags": ["Critical", "Production"],
"priority":"P1",
"note": "Location: {{RUN_LOCATION}}"
}
```
In case you would like different teams to be responsible for different Check Groups, you could add a `CHECK_GROUP_TEAM` variable with a different value for each Group, then modify the above snippet with the following:
```json team-responders.json theme={null}
"responders": [
{
"id":"{{CHECK_GROUP_TEAM}}",
"type":"team"
}
]
```
### PagerDuty
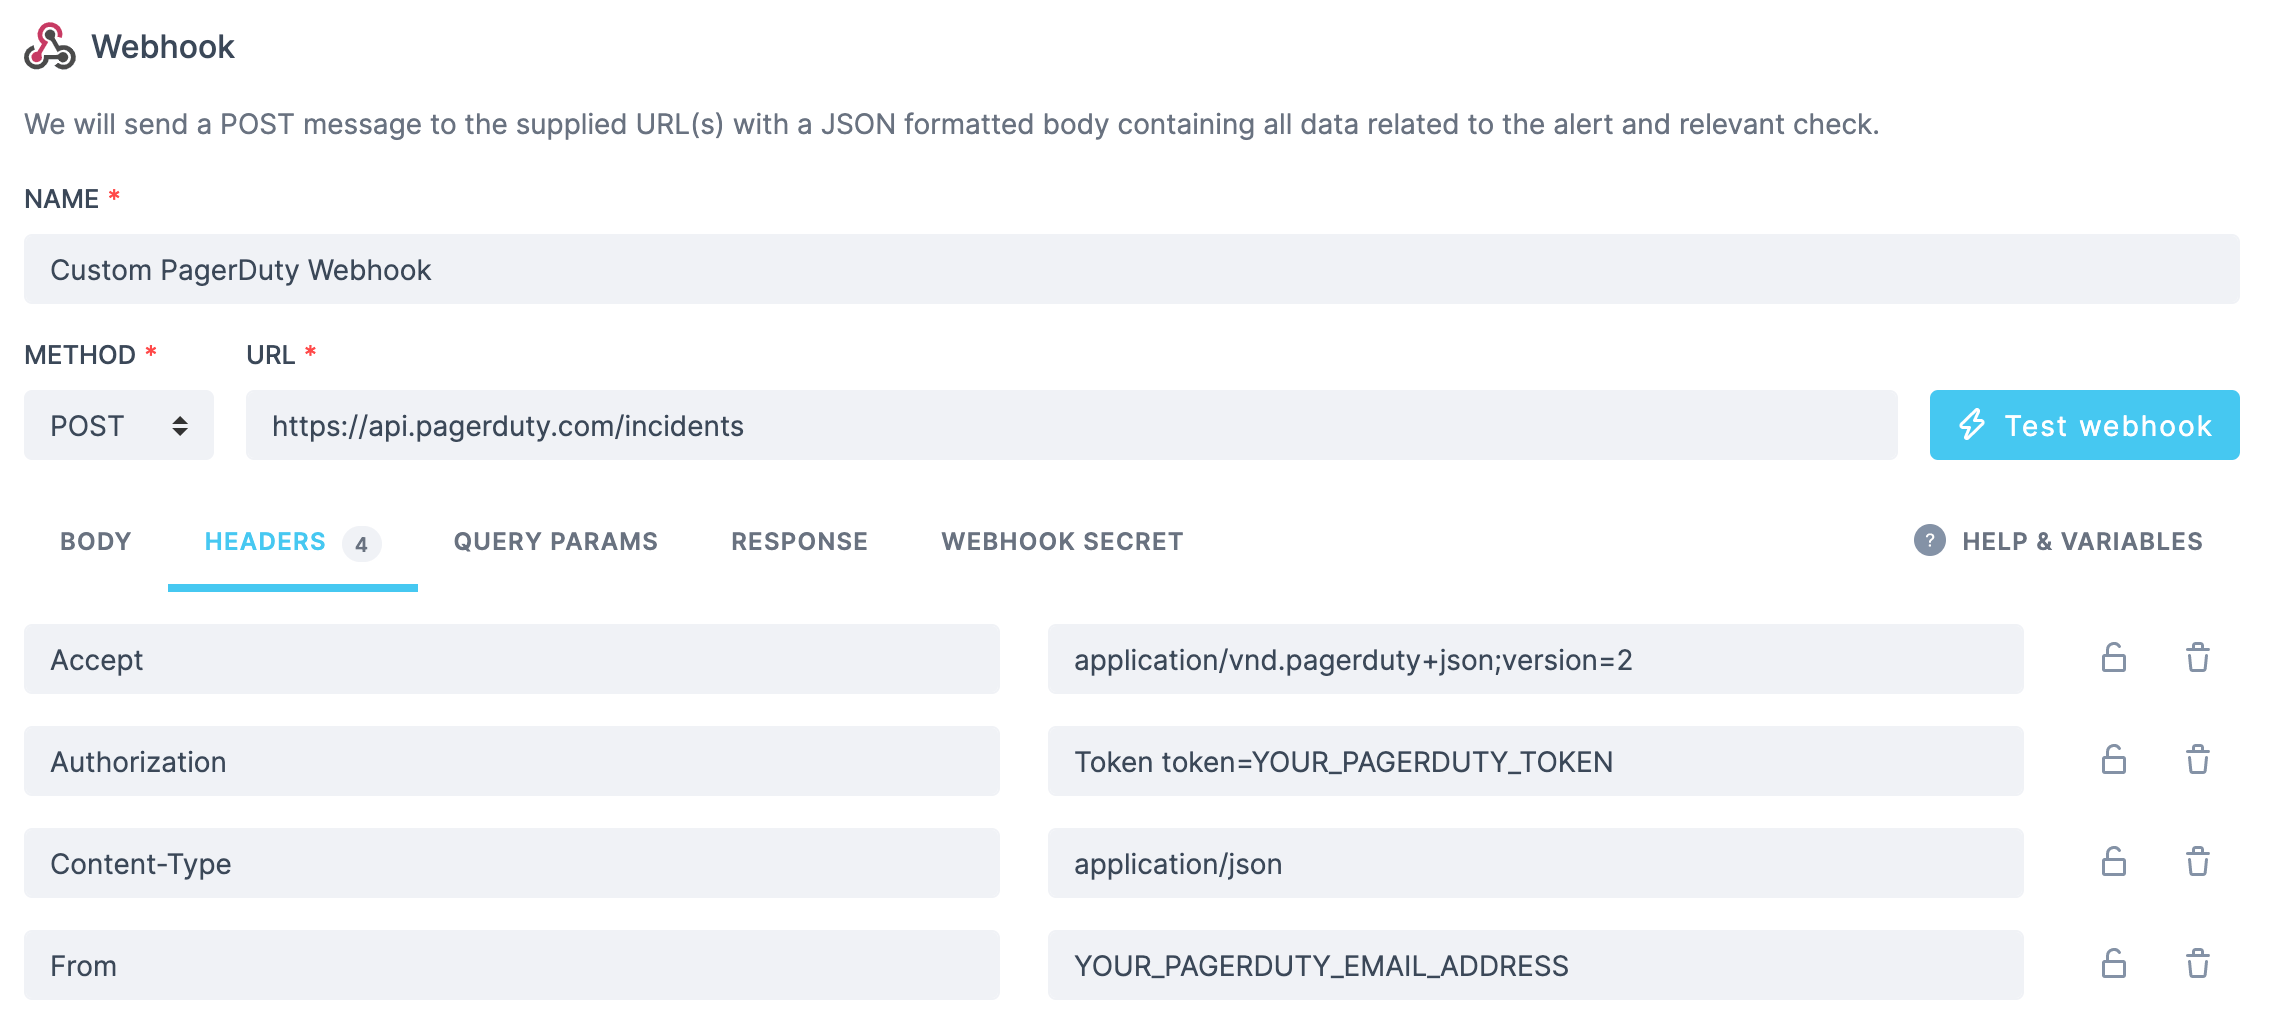
Given an existing service on your PagerDuty account, create an incident for it by posting the following body
```json pagerduty-webhook.json theme={null}
{
"incident": {
"type": "incident",
"title": "{{ALERT_TITLE}}",
"service": {
"id": "",
"type": "service_reference"
},
"body": {
"type": "incident_body",
"details": "Check {{CHECK_NAME}} with ID {{CHECK_ID}} has failed from location {{RUN_LOCATION}}. See check result for details: {{RESULT_LINK}}"
}
}
}
```
to `https://api.pagerduty.com/incidents`. You will need to set the following headers:
 ### Pushover
Send a message using [Pushover](https://pushover.net/) by posting this body:
```json pushover-webhook.json theme={null}
{
"token":"YOUR_SECRET_TOKEN_FROM_PUSHOVER",
"user":"YOUR_USER_FROM_PUSHOVER",
"title":"{{ALERT_TITLE}}",
"html":1,
"priority":2,
"retry":30,
"expire":10800,
"message":"{{ALERT_TYPE}}
### Pushover
Send a message using [Pushover](https://pushover.net/) by posting this body:
```json pushover-webhook.json theme={null}
{
"token":"YOUR_SECRET_TOKEN_FROM_PUSHOVER",
"user":"YOUR_USER_FROM_PUSHOVER",
"title":"{{ALERT_TITLE}}",
"html":1,
"priority":2,
"retry":30,
"expire":10800,
"message":"{{ALERT_TYPE}}
{{STARTED_AT}} ({{RESPONSE_TIME}}ms)
{{RESULT_LINK}}"
}
```
### Trello
You can create a [Trello](https://trello.com) card using just the URL and no payload:
```
https://api.trello.com/1/cards?idList=5b28c04aed47522097be8bc4&key={{TRELLO_KEY}}&token={{TRELLO_TOKEN}}&name={{CHECK_NAME}}
```
### SSL alert
You can send your SSL alerts using webhooks. Using the following body:
```json ssl-alert-webhook.json theme={null}
{
"message": "{{ALERT_TITLE}}",
"link":"{{RESULT_LINK}}"
}
```
Will yield the following output, where we customize the `ALERT_TITLE` to include the domain and the days remaining till your
certificate expires.
```json ssl-alert-response.json theme={null}
{
"message": "The SSL certificate for api.checklyhq.com will expire in 14 days",
"link": "http://app-test.checklyhq.com/checks/08437f9c-df8c-45ed-975a-a3f9e24d626d"
}
```
### Twilio
You can configure a webhook to POST to a JavaScript snippet running in a [Twilio Function](https://www.twilio.com/docs/runtime/functions). This code receives the Checkly webhook JSON, then triggers a Twilio "Flow execution":
```javascript twilio-function.js theme={null}
//"From" is the sender phone number
//"To" is the receiver phone number
exports.handler = async function (context, event, callback) {
const { From, To, Event, Link } = event;
const client = context.getTwilioClient();
try {
const execution = await client.studio.flows(FLOW_SID)
.executions
.create({ to: To, from: From, parameters: { Event, Link } })
console.log(`Created execution ${execution.sid}`);
return callback(null, "OK");
} catch (error) {
return callback(error);
}
};
```
### Jira
A webhook can be used to create a new issue on Jira via the [Jira API](https://developer.atlassian.com/cloud/jira/platform/rest/v3/intro/), for example in the case of a previously passing check that switches to failing state.
We will be creating a POST request to `{{JIRA_INSTANCE_URL}}/rest/api/3/issue`, where the content of your `JIRA_INSTANCE_URL` environment variable would look something like `https://your-jira-instance-name.atlassian.net`.
The required headers will be:
```bash jira-headers theme={null}
Authorization: Basic
Accept: application/json
Content-Type: application/json
```
For more details on authenticating with the Jira API, refer to [Atlassian's guide on basic authentication](https://developer.atlassian.com/cloud/jira/software/basic-auth-for-rest-apis/).
An example body could look as follows:
```json jira-webhook.json theme={null}
{
"fields": {
"description": { // your Jira issue description, using Atlassian Document Format (ADF)
"version": 1,
"type": "doc",
"content": [
{
"type": "paragraph",
"content": [
{
"type": "text",
"text": "View check result",
"marks": [
{
"type": "link",
"attrs": {
"href": "{{RESULT_LINK}}"
}
}
]
}
]
}
]
},
"issuetype": {
"id": "10001" // your Jira issue type id
},
"labels": [
"needs_investigation"
],
"priority": { // dynamically set the issue priority, based on the check's tags
"id": {{#contains TAGS "P1"}} "1"
{{else}} {{#contains TAGS "P2"}} "2"
{{else}} {{#contains TAGS "P3"}} "3"
{{else}} {{#contains TAGS "P4"}} "4"
{{else}} {{#contains TAGS "P5"}} "5"
{{else}} "3"
{{/contains}} {{/contains}} {{/contains}} {{/contains}} {{/contains}}
},
"project": {
"key": "ABC" // your Jira project key
},
"summary": "{{ALERT_TITLE}}"
}
}
```
For full details on creating issues via the Jira API, see [Atlassian's documentation for this endpoint](https://developer.atlassian.com/cloud/jira/platform/rest/v3/api-group-issues/#api-rest-api-3-issue-post).
You can also use version 2 of the Jira API (i.e. `{{JIRA_INSTANCE_URL}}/rest/api/2/issue`). The only difference is that version 2 does not support [Atlassian Document Format (ADF)](https://developer.atlassian.com/cloud/jira/platform/apis/document/structure/).
## Webhook Best Practices
* **Authentication**: Always use proper authentication (API keys, signatures, OAuth)
* **Idempotency**: Design endpoints to handle duplicate webhook deliveries gracefully
* **Error Handling**: Return appropriate HTTP status codes (200-299 for success, 4xx/5xx for errors)
* **Timeout**: Respond to webhooks quickly (within 30 seconds) to avoid retries
* **Logging**: Log webhook events for debugging and monitoring
* **Security**: Validate webhook signatures and implement replay attack protection